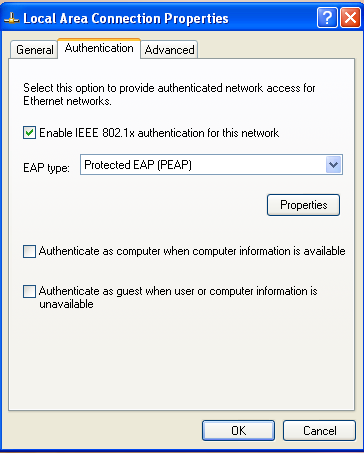
Select the Authentication tab in
Local Area Connection Properties (Fig 2) (Fig 4 is now displayed)
If the authentication tab is missing, please consult
microsoft support artile 950725
entitled "The Authentication tab is missing in the properties dialog box of the wired network adapter after you install Windows XP Service Pack 3"
Tick Enable IEEE 802.1x authentication
Select ProtectedEAP (PEAP) from the list of EAP types.
Deselect Authenticate as computer and
Authenticate as guest
Click Properties
Fig 4: Authentication window for Local Area Connection Properties
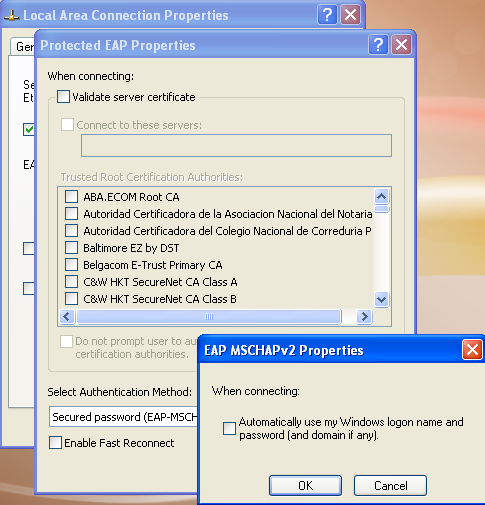
Select Validate server certificate
and tick GTE CyberTrust Global Root which is about halfway
down the list of Trusted Root Certificate Authorities.
Select Secured password (EAP-MSCHAP v2)
from the list of Authentication methods
Deselect Enable Fast Reconnect
Click Configure
Fig 5: Protected EAP Properties Window
Deselect Automatically use my Windows logon name
Click OK for the EAP MSCHAPv2 Properties
Click OK for the Protected EAP Properties (Fig 5)
Click OK for Local Area Connection Properties (Fig 4)
Fig 6: EAP MSCHAPv2 Properties window
After the ethernet cable is connected a dialogue balloon will appear in the
systems tray prompting the user to Select a certificate or other
credentials. Click in this balloon to display Fig 7
WARNING:
If Windows taskbar balloon-tips have been disabled (either by using the
windows XP TweakUI power toy or editing the registry), then you will
not see the balloon.
You will need to click on the wireless network icon in the taskbar to obtain
the login window.
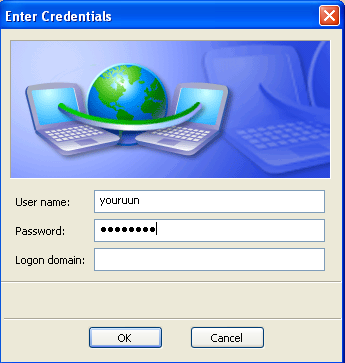
Enter your UUN and the password which you have registered to use when
accessing the VPN/Wireless/LapLAN2 services.
Leave the domain field blank.
Click OK (Fig 7)
Fig 7: Enter Credentials Window
Your laptop should now authenticate with the VPN/Wireless/LapLAN2 RADIUS
server and, if successful, gain network access and be assigned an address
in the range 172.20.16.1 to 172.20.19.247.
If your access request is rejected you should have been assigned an address
in the range 172.20.28.1 to 172.20.31.247. You will still be able to authenticate in the
same manner as if you were on the EUCS Wireless network.
Either start your browser and attempt to load a page using the standard
http port 80 and you will be redirected to the LapLAN2 login page
Or establish a VPN tunnel to the EUCS VPN gateway.
If you are not assigned an address in either network,
Click Repair
If you are successful in authenticating using 802.1X, the windows system will
remember your credentials and will not prompt for them the next time you connect
(IE no dialogue balloon).